No-code sample: Teltonika tracker
In this tutorial I’ll show how to use a Teltonika GPS tracker with Span. You’ll need a tracker, something to power the tracker and a SIM card. I’ve used the FMC880 and FMC003 trackers in this example.
The FMC880 is the easiest to get going since it just has two wires to connect.
Configure Span
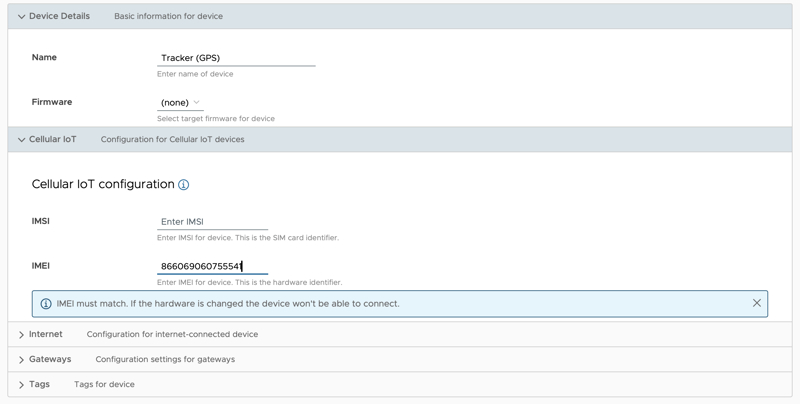
If you look at the outside of the tracker you’ll see the IMEI printed on the outside. If you want to save time you can scan the QR code to get the IMEI. Create a new device in Span and enter the IMEI.
A neat trick on iPhone is to point your camera at the QR code, then click on the icon in the bottom right hand corner when the QR code is detected and select “copy” to copy it to the clipboard. If you use macOS on your computer you can paste the IMEI directly into the Span dashboard:
Configure the tracker
The next step is to configure the tracker to connect to Span. Start the configuration tool and edit the GPRS configuration:
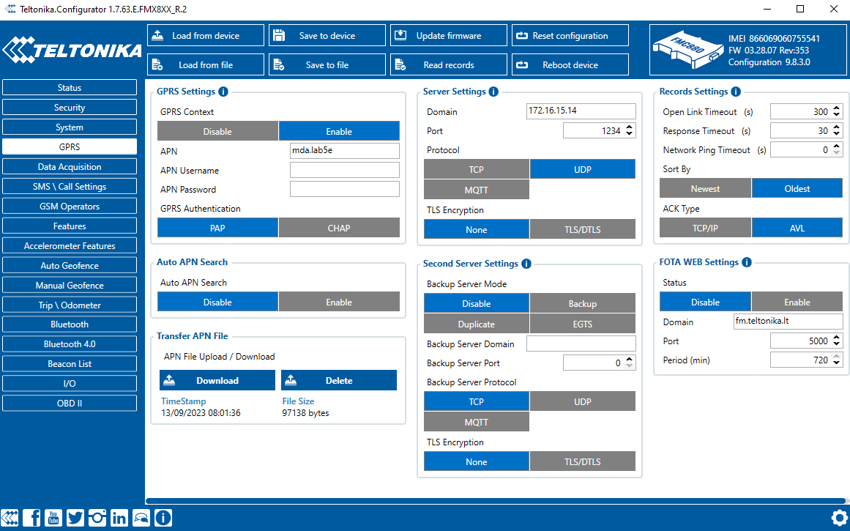
- Enable the GRPS context, set APN to
mda.lab5eorlab5e.com4.netdepending on your sim card. - Set the domain in server settings to
172.16.15.14 - Set the port in server settings to
1234 - Set the protocol to
UDP - Set the TLS encryption field to
None - Set the second server to
Disabled
This ensures all packets are sent as unencrypted UDP packets to 172.16.15.14
Apply the configuration and wait for a minute or two. The tracker should get
online, get a GPS fix and start sending data to Span. Make sure the antenna has
a somewhat unobstructed view of the sky. The antenna included in the tracker
is quite sensitive so even a view through a window should be enough.
sh
Verify output
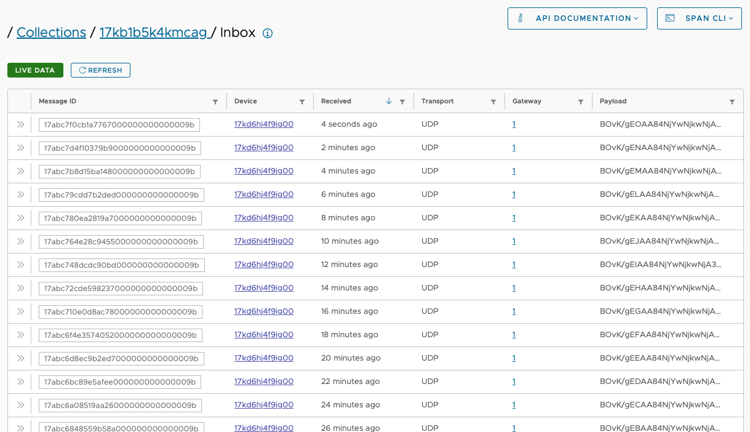
Click on the Inbox and then click on the Live data button to start monitoring. The tracker should send encoded packets at regular intervals. Decoding the packets and acking them is relatively straightforward but will require some coding.
 That’s it!